Removing and Inserting Borders in Tables
Creating tables is a great way to display data, making it easier to read. Once a table is created, the look of your table can be changed by customizing the border’s style, color, and width.
By default, when you insert a table into a Word document, the top, bottom, left, right, and inside borders are in the table. If you want to remove, add, or change borders, start by selecting the table.
- Hover over the table.
- The Table Move handle
 will appear in the upper left-hand corner.
 - Click the Table Move handle to select the table.
- Now, follow the instructions below to remove, add, or customize borders.
Remove Borders
- With the table selected, go to Home, Paragraph group, then select the Borders list arrow.
- A drop-down menu will appear.
- Select No Border.
Add Borders
- Select the table.
- Go to Home, Paragraph group, then select the Borders list arrow.
- Select All Borders from the drop-down list. Now you will have borders around all cells in the table.
You can add and remove top, bottom, right, and left borders. All of these options are located in the Borders drop-down list.
Customize Borders
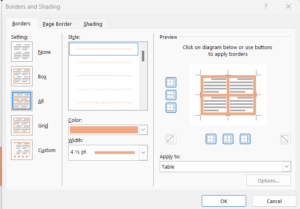
- Go to the Borders and Shading dialogue box.
- Select your choice of style, color, and width of borders.
- Click on the diagram located on the right side of the Borders and Shading dialog box to apply your selections to the borders of your choice.


