Using Mail Merge
Mail merge involves linking data from another file to your document, which can be a letter, label, or envelope. I’ll use a form letter as an example to guide you through creating a mail merge.
It’s important to close all documents before beginning a mail merge to avoid unforeseen outcomes.
Main Document
Begin by typing a form letter as usual, leaving the recipient’s name, address lines, and greeting line blank. The spacing is as follows: ENTER five (5) times, type the date, then ENTER eight (8) times, and begin the body of the letter. Once you’ve typed the form letter, Save the document with a descriptive file name.
Data Source
Go to the Mailings tab, Start Mail Merge group, Select Recipients and select Type a New List.
Enter the first recipient’s information in the New Address List. Once done, select the New Entry button to type the next recipient’s information. After entering all recipients, select OK. This will open the Save Address List dialog box where you will SAVE the document in the My Data Sources folder and name the file in a way that reflects the address list.
Placeholder
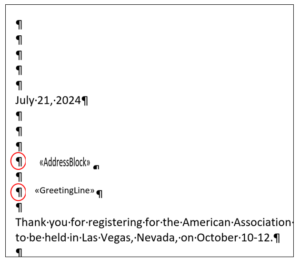
Now that you have your address list complete, you will insert the recipient’s information into the form letter. Click before the paragraph mark where the address should be typed (shown below in the diagram), then go to the Mailings tab, Write & Insert Fields group, then Address Block. The Insert Address Block dialog box will open. Look at the Preview Window to ensure your data is displayed correctly, and select OK once the data has been verified.
Next, you will click in front of the paragraph mark where the salutation should be typed (shown below) and insert the greeting line by going to the Mailings tag, Write & Insert Fields, then Greeting Line. The Insert Greeting Line dialog box will open, under Greeting line format select the format options of your choice, and click OK. 
Merge
Navigate to the Mailings tab, Write & Insert Fields group, click Highlight Merge Fields. This will highlight the inserted placeholder for the merged fields. Select Preview Results to view the data.
The data from the recipient list should be displayed in the form letter. From the Results group, click on the Next Record button to cycle through the form letters to ensure the data is displayed correctly.
After the data has been verified, you are ready to finalize your mail merge. Go to the Mailings tab, Finish group, click Finish & Merge, Edit Individual Documents, All, and OK.
Now you have a document with all of the merged letters in one file. Save the document with a new file name.
Although there are several steps in a mail merge, with practice, you will become proficient at it.


